In this tutorial we will learn how quickly we can arrange for a CRUD (Create, Read, Update, Delete) Java EE application starting from a Database Table. We will use a mix of technology such as NetBeans IDE, WildFly and JBoss AS 7 as application server and Java EE and PrimeFaces API.
So, the requirements for this tutorial are:
- A NetBeans 8 environment
- A JBoss/WildFly application server
- A relational database
mysql> desc customer;+------------+-------------+------+-----+---------+-------+| Field | Type | Null | Key | Default | Extra |+------------+-------------+------+-----+---------+-------+| idCustomer | int(11) | NO | PRI | NULL | || Name | varchar(45) | YES | | NULL | || Address | varchar(45) | YES | | NULL | || email | varchar(45) | YES | | NULL | |+------------+-------------+------+-----+---------+-------+
Now, provided that you have defined the application server through NetBeans' Services Menu, let's start creating a sample Web application. Select from the File Menu: New Project and choose to create a Web applicationChoose a name and location for your Web application and a package, as shown by the following picture:Click on Finish. You will end up with an empty Web project. Let's start now cooking some Entities. Select from the File menu a New Entity Classes from Database. Our Entity will be based on the Customer table that we have formerly created:
Please note that you need to define a Datasource on the application server in order to be able to Reverse engineer your Database tables into Entities. Click on Next and complete the wizard by specifying the main Project and the package to be used for your Entity:
As you can see, you can automatically have your Named Query defined for your Entity along with the JAXB annotations if required and the Persistence Unit which maps to the Datasource we have installed on the application server.
Here is the Customer Entity which has been created for us by the Entity from database wizard:
@Entity@Table(name = "customer")@XmlRootElement@NamedQueries({ @NamedQuery(name = "Customer.findAll", query = "SELECT c FROM Customer c"), @NamedQuery(name = "Customer.findByIdCustomer", query = "SELECT c FROM Customer c WHERE c.idCustomer = :idCustomer"), @NamedQuery(name = "Customer.findByName", query = "SELECT c FROM Customer c WHERE c.name = :name"), @NamedQuery(name = "Customer.findByAddress", query = "SELECT c FROM Customer c WHERE c.address = :address"), @NamedQuery(name = "Customer.findByEmail", query = "SELECT c FROM Customer c WHERE c.email = :email")})public class Customer implements Serializable { private static final long serialVersionUID = 1L; @Id @Basic(optional = false) @NotNull @Column(name = "idCustomer") private Integer idCustomer; @Size(max = 45) @Column(name = "Name") private String name; @Size(max = 45) @Column(name = "Address") private String address; // @Pattern(regexp="[a-z0-9!#$%&'*+/=?^_`{|}~-]+(?:\\.[a-z0-9!#$%&'*+/=?^_`{|}~-]+)*@(?:[a-z0-9](?:[a-z0-9-]*[a-z0-9])?\\.)+[a-z0-9](?:[a-z0-9-]*[a-z0-9])?", message="Invalid email")//if the field contains email address consider using this annotation to enforce field validation @Size(max = 45) @Column(name = "email") private String email; public Customer() { } public Customer(Integer idCustomer) { this.idCustomer = idCustomer; } public Integer getIdCustomer() { return idCustomer; } public void setIdCustomer(Integer idCustomer) { this.idCustomer = idCustomer; } public String getName() { return name; } public void setName(String name) { this.name = name; } public String getAddress() { return address; } public void setAddress(String address) { this.address = address; } public String getEmail() { return email; } public void setEmail(String email) { this.email = email; } @Override public int hashCode() { int hash = 0; hash += (idCustomer != null ? idCustomer.hashCode() : 0); return hash; } @Override public boolean equals(Object object) { // TODO: Warning - this method won't work in the case the id fields are not set if (!(object instanceof Customer)) { return false; } Customer other = (Customer) object; if ((this.idCustomer == null && other.idCustomer != null) || (this.idCustomer != null && !this.idCustomer.equals(other.idCustomer))) { return false; } return true; } @Override public String toString() { return "com.sample.Customer[ idCustomer=" + idCustomer + " ]"; } }
Done with th Entity, let's now create a CRUD interface for the Entity using PrimeFaces JSF libraries. Reach again the upper menu and select New JSF Pages from Entity classes. There choose as Entity class the only one which is available right now:
Click on Next. In the following screen, you can configure the SessionBean package for the EJB facade that will be created for your application:
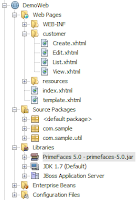
Pay attention to the ComboBox that is at the bottom of the screen. There we have selected as JSF template the PrimeFaces libraries. Click on Next, then Finish the wizard. The expected outcome will be a Java EE application which uses an EJB facade to mediate the requests with the Model class, the Customer Entity. We have also a set of JSF pages (Create.xhtml, Edit.xhtml, List.xhtml and View.xhtml) that are used to handle every possible scenario. As last addition, remember to include in your Project library the PrimeFaces library which needs to be bundled into the WEB-INF/lib folder of your application:


No comments:
Post a Comment